Bonbon is one of the varieties of patchwork quilts made in a special technique. To make such a blanket you have to work hard, but then you can’t take your eyes off the finished product.
DIY Bonbon Quilt: Materials
To make such a blanket you it will take a lot of fabric, filler and strong threads. Do-it-yourself handy bonbon sewing in the same way: scissors, tape, needles or pins for fixing fabric and a sewing machine.
Regarding the material, it is important to note that in the manufacture of fabric can be used as a single species or different. For example, any beautiful even synthetic fabric is suitable for the upper or front side, and for the lower or inner part of the blanket it is preferable to use natural cotton materials, satin, linen, poplin and so on.
It is best to use synthetic winterizer or holofiber as a filler for a blanket. Batting is also suitable for these purposes. It is worth noting that this is a heavier material, quickly absorbing and retaining moisture for a long time. However, many housewives who sew blankets with their own hands give preference to him and call batting a natural insulation.
Do-it-yourself ways to make a bonbon blanket
A variety of bonbon blankets in itself implies the presence of small independent pillows with a filler, assembled closely with each other on a single canvas. The so-called bubble effect. However, there are several ways to get such a result and make a do-it-yourself bonbon blanket.
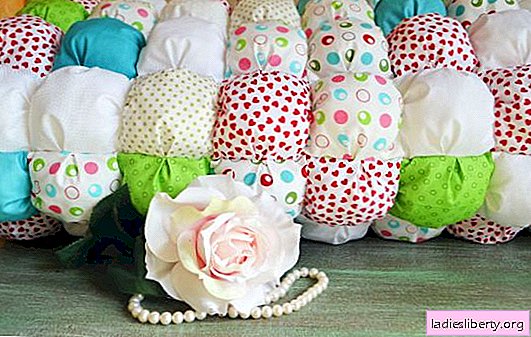
Bonbon blanket from individual pillows

For this blanket you will need two types of fabric: front and inner. The facial tissue is taken beautiful and bright, and for the internal tissue, the usual is not remarkable. After the blanket is ready, the inner fabric will not be visible, so you can use the wrong sheet.
Make a square-shaped template that you will need to cut the details into. The size of the square is up to you to determine, however, it should not be less than 7 × 7 cm. And more than 40 × 40 cm. Otherwise, the blanket will not turn out to be beautiful.
According to the finished template, cut the required number of parts from the front fabric and the same amount from the inside. Connect the squares from different fabrics together so that the top fabric is turned face up. Sew the three edges first, add the filler and stitch the fourth. Repeat this work with all the details. You should get a lot of small pads that should now stitch together.

First sew the pads in the form of lines along the side seam. Each should have the same number of pads. Next, stitch the lines between each other, strictly observing the rows and avoiding distortions.
After the pad fabric is ready, you need to add the bottom fabric. To do this, take natural cotton material. On a flat surface, first lay down the lower fabric, face down, on it with a cloth from the pads face up.
If you want to make the blanket even warmer, you can put a layer of synthetic winterizer or batting between these fabrics. Fasten the layers with needles or pins and sew a blanket along the edge along with the edging. For edging, use an oblique trim or ribbon of fabric from which a blanket is sewn.
Bubble blanket

As for the bubbles, this is more of a joke. In the process of sewing, one gets the feeling that the fabric is stratified and went into bubbles. This effect can be achieved when small squares are sewn separately to the whole large fabric canvas one by one.
To do this, you need to decide what size you want to see the squares on the blanket. They can be either large or small, depending on your desire.
Prepare the canvas base. It should be the size of which size you want to see the final product. Using a pencil or soap, draw a box on the inside of the box with the dimensions of the proposed tubercles. Marking should be done over the entire surface of the fabric, as shown in the picture.

Now you need to make a template for shreds that will be larger than the size of one drawn cell. Add to the size of the cell 2-3 cm for each side and plus 1 cm inlet. Cut a template with the resulting dimensions out of cardboard and use it to make parts from another facial fabric, which will be sewn according to the marking.
Sew the cut squares with one another in a long line. The number of squares in the line will be equal to the number of squares on the fabric in one direction (horizontally or vertically). Do this job with all the details cut out.
Now sew the strips to the fabric, while for each pillow, fold the excess fabric into a fold so that the seam between the pillows coincides with the drawn lines.

Pull the bottom of the pads to the line of the pattern, folding the excess fabric into a crease. Fix the pads on the fabric with needles or pins. Sew the side seams strictly along the seam between the squares.

Now comes the moment when you need to decide whether you want to fill the pads immediately after sewing each line or after you sew all the pads. If you decide to fill the pads immediately, then first fold the bottom of each square without grasping it with the base, and fill it with filler. After gently grab the pin and hook the upper fabric to the base.
Next you need to sew the next strip. To do this, it is first folded, and then sewn to the previous strip. Place the fabric with the front side to the front.

Next, you need to do the same: fold and stitch the side seams and folds, and then fill the pads with filler, make the bottom fold and sew the next strip.
You can also fill the padding pad after you sew all the pads. To do this, a small incision is made on the lower tissue of the pad, through which you fill it with padding polyester. Then you will need to sew the incision manually.

After the main fabric of the blanket is ready, it is necessary to process the edge. To do this, it is suitable as a slanting inlay, which you wrap and stitch the edge or a cut strip of fabric. Its width is from 3 to 5 cm, and the length is equal to the length of the side of the blanket to which you will sew it. In this case, do not forget to turn the cut edges inward.
DIY Bonbon Quilt: Professional Tips
• Think over the pattern of the blanket in advance, draw it on paper or in the computer and paint it in the desired shades.
• Do not save on filler, because the more magnificent the pillow, the more interesting the whole product will look.